Let the Adventure Begin

This gallery contains 3 photos.

Ethan and I are HUGE JRR Tolkein fans. We rotate through The Hobbit movies, Lord of the Rings, Harry Potter, and Pirates of the Caribbean on loop. Our special love of Middle Earth aided in our choice of #EAKAdventures16 as … Continue reading

Ham and Bean Soup

This gallery contains 2 photos.

I do not like ham and bean soup. I don’t like beans in any capacity. I may be a carnivore but I don’t really like ham. We had a few snow days in March, so I made a list of … Continue reading

Chicken Crust Pizza

It’s been a crazy couple of months for this girl. I went right from working full time at my favorite place in the world, to a long term subbing assignment at an inner city school, moved out of my parents into what would be our first apartment, started a new long term assignment at a different school with my own classroom, finished planning a wedding, and got married. Needless to say, I haven’t had too much time to breathe. BUT I have an entire collection of recipes, classroom freebies and adventures, wedding pictures and vendors, that I’ve been stock piling for when I was finally able to join the blogging world again.

Being that I have a special affinity for food, it’s only fitting that my return post be one of my new favorites, and one that Ethan LOVES- chicken crust pizza. This recipe was cooked in a 10in cast iron skillet, to give you an idea of space: ingredient ratio.

What you’ll need:

2-3 boneless skinless chicken breast (ground chicken is fine too)

1 egg

About ½ cup bread crumbs

Tomato sauce of choice (I use canned stuff from my parents garden)

Spices of choice (to add to your sauce- I do onion, garlic, basil, oregano, and red pepper flakes)

PIZZA TOPPINGS! This is my favorite part! I get good mozzarella, pepperoni, and fry up some bacon

Preheat your oven to 375.

  1. In a food processor, ground the chicken with the egg. It will be a fairly mushy consistency. Mix in the bread crumbs by hand or with a spoon. The egg helps keep the chicken from shrinking and the bread crumbs help bind it all together.
  2. Smoosh the chicken into the bottom of a baking dish, or skillet. Make sure it is pretty even. I like to make the edges a bit thicker like a real pizza crust. Put in the oven for at least 20 minutes or until it’s no longer pink.
  3. The sauce can be done a number of ways. I usually start my sauce on the stove well before I’m ready to use it to give the flavors time to meld and develop. You could also just use a jar of Ragu, the choice is really up to you. I do however recommend heating the sauce before using it.
  4. After the chicken crust is done baking, assemble the toppings! This is a great chance to get the kids or your spouse involved. I fried bacon, then sautéed onions in the bacon fat. I added some of the onions to the sauce, and used the rest as a topping on the pizzas. Bacon makes everything better.
  5. Since the chicken is already cooked and the sauce is already warm, you’re really only putting it back in the oven to melt the cheese (clearly the best part). I put it back in the oven at 375 for about 10 minutes to get it started, and kick on the broiler to really finish bubbling the cheese.

EAT! 😀

First Class Ice Breaker

I hate 2 truths and a lie. More often than not, it’s done with a group of people who know each other fairly well, so it’s not that exciting. During the first week of school the schedules are wonky, some things take forever, others only 5 minutes. For the days when I only have 5 min of stuff in a 15 min chunk, I came up with some fun questions. Some are more personal, some are serious, some are silly, some are would you rather. Along with questions for the students, I threw in “Ask the teacher a question” cards to give them the chance to ask ME some good ones.

  1. What animal are you most afraid of? Why?
  2. What is your favorite color. Be specific.
  3. Stripes or Polka dots?
  4. What is your favorite donut flavor?
  5. What motivates you?
  6. The best superpower to have would be…? Why?
  7. Summer or winter?
  8. Have you ever traveled out of the US? If yes, where did you go?
  9. If you could be a dinosaur, what kind would you be?
  10. What is your favorite TV show?
  11. What is your favorite movie series?
  12. Who is your favorite superhero? Why?
  13. What is your favorite book series?
  14. Do you have any idea where you want to go to college?
  15. If you had to be a teacher, what would you teach? Why?
  16. What was your favorite book as a child?
  17. Dogs or cats?
  18. If you had $5,000 how would you spend it?
  19. Coffee or tea?
  20. What is your favorite book? Why?
  21. What is your favorite time period? Why?
  22. What is your number 1 goal in the next 6 months?
  23. If you could be any animal for a week what would you be? Why?
  24. Do you have a fear of public speaking?
  25. What actor/actress would you have play you in a movie about your life? Why?
  26. Chocolate or strawberry milk?
  27. If you were on a TV game show, what show would it be?
  28. If you could eat dinner with a dead person, who would it be and why?
  29. What is your favorite ice cream flavor?
  30. What is your favorite cartoon?
  31. If ability, time, and money weren’t an issue, what would be your dream job?
  32. Who is your favorite Disney character
  33. Who has been your favorite teacher EVER? Why?
  34. What are you most worried about this school year? Why?
  35. What hobby would you like to start/learn? Why?
  36. Who is your favorite author? What genre do they write?
  37. Do you have a favorite quote, mantra, verse, or motto?
  38. If you could be a Disney princess, who would you be? Why?
  39. What is your biggest pet peeve?
  40. What is your favorite book series? Why?
  41. Do you have any siblings? Who’s your favorite?
  42. The best song to dance too is…?
  43. M&Ms or Skittles?
  44. What is your absolute least favorite food? Why?
  45. If you could go anywhere, where would you go? Why?
  46. What kind of wake up alarm do you have? Song/music or buzzer/ring?
  47. Do you have any hidden talents?
  48. What is your favorite sport? Why?
  49. Beach or mountains?
  50. Where is your family from?
  51. Where were you born?
  52. When you think of comfort food, what do you think of?
  53. What has been your favorite Shakespeare play? Why?
  54. What is something you really struggle with that you’d like to improve/get better at?
  55. What is your favorite kind of soup?
  56. Would you rather: 30 screaming babies in a room or one very hungry alligator?
  57. Take a bath in ice cubes or tomato soup?
  58. Do you collect anything? What is it?
  59. What do you never leave the house without?
  60. When you were a kid, what did you want to be when you grew up?
  61. If you could be a Disney villain, who would you be? Why?
  62. If you could meet a celebrity, who would it be? Why?

Have any other questions you think would be fun!? Let me know in the comments! 🙂


Germ-Be-Gone Drink

I am a teacher. I live with a teacher (my mom). My fiance is in ministry- aka, more public germs. We are surrounded every day by germs. But when back to school season is upon us, the germ exposure goes up dramatically in our house. My mom is in one school, and I sub so I’m in multiple schools a week, sometimes 2 in one day. My germ exposure is THROUGH THE ROOF! I also still have my tonsils (yuck). I also HATE getting sick. Most people hate getting sick, but I super hate it. So, I came up with this awesome germ-be-gone stuff and it’s 4 ingredients.

Why honey, lemon and ginger? Here are some fun health facts!

Ginger: Ginger has been used for thousands of years in homeopathic natural medicine. It is known as an immunity booster, to fight cancer, to reduce inflammation and pain, heart health, anti-biotic, and general gut health!

Lemon: Lemon is another great (delicious) natural immunity booster, antibacterial, antiviral, improves digestion, energy booster, reduces inflammation, is great for your skin, aids in alkalizing and cleansing your body, and bumps up your vitamin C!

Honey: The important thing about honey is trying to get it as raw and unprocessed as possible. Even better, is finding honey sourced in your area. This means that the pollens that the honey is made of is the same kind of stuff you breathe in everyday, which in turn helps will allergies! Honey also helps digestion, boost immunity, has antiviral properties, full of antioxidants, stabilizes blood pressure and blood sugars, antiseptic, and coats/sooth sore throats.

By mixing these 3 powerhouse ingredients, you make one yummy drink AND make your body very happy, all while killing germs and preventing sickness!

What you’ll need:

2-3 lemons

Small knob of ginger (dried stuff works too)

2-4 tablespoons of honey (depending on how sweet you like it)

Water

Large container that can handle hot water to put it all in.

Screen Shot 2016-08-28 at 10.46.49 AM.png

  1. Get water boiling on the stove.
  2. Rinse and slice your lemons. Pick out the seeds!
  3. Peel and chop your ginger. You can grate it, or leave it chopped.
  4. In your container, place your lemon slices and chopped ginger. Add in your honey. I think 3 tablespoons is usually pretty good.
  5. Let your mixture “steep” and cool. I usually let mine sit for at least 3 hours. You can leave all the stuff in, or you can strain it out. Totally your choice.

Drink at least a cup a day to help keep the icky germs away! You can make small batches in a mug, but I find making it in larger quantities is easier since I drink so much of it. I also enjoy drinking it warm verses drinking it cold. I feel like it is much more soothing and affective that way. Screen Shot 2016-08-28 at 10.47.27 AM.png


Pine Cone Crafting

As the school year approaches, the day of our wedding looms closer. We are ALMOST at the 100 day mark! I took one of my last free weekends, and spent the morning with one of my bridesmaids crafting! I found this general concept on Pinterest but made it my own.

What you’ll need:

Pine cones (I used cinnamon scented craft/decor ones)

1/4 inch ribbon

3/4 inch ribbon

1 inch ribbon

Scissors

Hot glue gun

Jingle bells of varying sizes (optional)

*please excuse the newspaper I used to protect the table!* 🙂

I am going to hang these on the ends of pews, backs of chairs, and a few other places. I created loops with a 6-8 inch strands of the 1/4 inch ribbon. My bridesmaid Alexa turned out to be the bow tying champ of all time. She tied each bow, varying lengths, and cut the ends on a slight angle.

14088938_10210059550310412_196400074_n.jpg

HANDY TIP!!! It is way easier to make a pile of bows and cut a bunch of ribbon to start and then go through and glue it all. The process goes way faster/smoother!

14111794_10210059563950753_214997405_n.jpg

Using the hot glue gun, I took a length of thin ribbon, and glued the ends.

14111598_10210059563910752_868513480_n.jpg

I then put a small spot of hot glue on the back of a bow and applied it to a loop. I tried to spread the ribbon so that the bow was glued to both the front and back of the loop not just the front for more stability.

14111765_10210059563390739_1266549419_n.jpg

Apply a small line of hot glue to the top of a pine cone and gently press in the tail end of your loop that you hot glued into it.

14081273_10210059552190459_544791538_n.jpg14111987_10210059551270436_1529960846_n.jpg

Let set and you have a super cute pine cone! If you’re feeling fancy, or have a little too much ribbon showing under the bow, add a jingle bell or two!

14111729_10210059550790424_1910583029_n.jpg

Teaching Portfolio (And Back-To-School-FREEBIES!)

With the school year quickly approaching, I’ve spent the last 24 hours refreshing my teaching portfolio, reviewing standards, and making some new materials. I’m not in my own classroom |yet| BUT it’s never too early to work on stuff anyway!

I took a trip to Staples last night and bought a new binder, dividers, and page reinforcers. I have a blue and white obsession. Just a standard 1 inch. 13936820_10209894090494020_2047740475_n.jpgI then created a cover page. Being that I LOVE old literature, authors, and books, I decided to stick with that theme for my cover. My name, certification, and “teaching slogan” grace the front with a collection of beautiful, old, blue bound books.13884380_10209894089053984_1950627798_n.jpg

Here are some samples of what I have hiding INSIDE my portfolio. Obviously, not every page is shown, but you can see what was included in the table of contents.

Don’t forget the pretty dividers!13933534_10209894088933981_622815812_n.jpg

Now, I did promise some back-to-school-freebies. Sadly, I do not have free STUFF but I do have some free resources! Woo hoo! Feel free to download and use away!

1 The first freebie is a quick, easy way to assess students either during class or at the end as an exit slip. The front (first page) gives students the ability to self assess if they understand, sort of understand, or really don’t get it. The back (second page) gives them the chance to write down a specific question and their name. Simply print, copy 1 sided->2 sided, and cut between the boxes! How-are-you-doing

Screen Shot 2016-08-03 at 9.19.13 PM

2 This second one is very similar to the first. Instead of self-assessing understanding, this slip holds students accountable. If a student does not finish an in-class assignment, they will need to turn in this slip. If they turn it in filled out (honestly) partial credit or the opportunity to get extra time to finish. If it’s turned in without this sheet or not at all they get a 0. Harsh, but again, accountability. i-didnt-finish-because…

Screen Shot 2016-08-03 at 9.18.57 PM

I’m sure you noticed that the unit in my portfolio is Shakespeare’s Romeo and Juliet. It is absolutely one of my FAVORITE pieces to teach, and I’ve been fortunate enough to have the chance to teach it 3 times between my pre-service and student teaching. All components have been tested, used, and enjoyed by many students! Again, feel free to use or adjust any pages as you see fit!

1 One of my intro activities to the unit is a scavenger hunt around the room to answer these questions- Shakespeare Scavenger Hunt Qs

2 Gives students the space to identify which side characters are on and their personality traits- RJ Character List

3 This is one of my favorite assignments. The first year, I had the students focus on characterization by creating “Fakebook” pages. My freshmen informed me no one uses that so I created the same assignment for Twitter.

4 To help them brainstorm for their Twitter assignments, each student was given a character cloud sheet to collect their thoughts. Character Cloud WKST

5 The following are the assignment hand out and rubric for the Twitter project. I copied them so they were on one page front/back. Romeo and Juliet Twitter handout  / rj twitter rubric

6 Twitter page sample done for Queen Elizabeth I –RJ Twitter GQB This second page is an extention of the first- Twitter pics page GQB

7 Blank Twitter can be used for any book-RJ Twitter Second part of the assignment page- Twitter pics page

What do you have in your portfolio? Any suggestions as far as what to add?

What resources would you like to have added? If you would like any more from my Romeo and Juliet, JUST ASK!

Follow me on Instagram @brunetteswithbrains to keep up with the latest posts, adventures, books and news!

Shrimp and Chicken Pasta

Home alone. Well, kinda. Does having 4 dogs with you really count as “alone?” Is it kinda like “you’re not drinking alone if your <dog>/<cat> is with you?” Either way, after surviving on Cheerios for the last 3 days {no exaggeration, I eat like a toddler 95% of the time}, it was time for a “big kid meal.”

Ingredients:

1-2 lb shrimp (my bag was a 40-50 count)

Chicken (breasts, legs, what ever. I had some left over legs I chopped up and threw in)

Garlic clove

Butter

Olive oil

Pasta (penne is perfect!)

6 cups water

Tomato sauce (I used a pint mason jar of our homemade stuff)

1/2 cup red wine (optional but oh so yummy)

Salt/Pepper

Basil

Onion

Parmesan Cheese

Oh the best part, all done in ONE pan!!! BOOM!

*THAW AND PEAL YOUR SHRIMP BEFORE YOU START IF NEEDED! DONT FORGET TO DEVEIN! Prep what ever chicken you are using as well!*

  1. In your pan, melt butter with about 2 tablespoons of olive oil. While they are heating chop cup your garlic and onion.
  2. Once your butter has melted, on medium/high heat, add in your garlic and onion to sauté. While they are going, cut up your chicken, get your ingredients in order.
  3. Add in your shrimp and chicken to the butter goodness in the pan. Sear for 2-3 minutes.

13672090_10209826670848571_74546087_n4. Add in your tomato sauce, water, pasta, red wine, and sauce seasonings

13652707_10209826670768569_1814399578_n5. Cook at a low boil until the pasta is cooked through.

6. Serve nice and hot with parmesan on top!

13866552_10209826670048551_1147231988_n

Total prep (including shrimp for me) 30 min. Clean up- 5 minutes, we have a great non-stick pan.


Bridal Shower and Wedding Decor

If you’ve been following my blog posts the last few months you’ll know that I got engaged and have been planning a wedding. You can read about the planning process thus far in my posts Wedding Planning on a Budget Part I and Wedding Planning on a Budget Part II. In this post, I will be sharing how my mom and I have been using doilies, paint, scrapbook paper, ribbons, “K” stickers, picture corners, string, and old farm windows to make some really personal touches for both the bridal shower and the wedding.

Our world has looked something like this the last few weeks…

13244820_10209249192091963_495318408609654642_n.jpg

First, I LOVE being Irish and this was maginified after my trip to Ireland/Northern Ireland 2 years ago. Our wedding is ironically SO traditional that people think we’re being UNtraditional! One of the traditions that I fell in love with is hand tying or handfasting.

The Handfasting Ceremony is an ancient Celtic tradition symbolizing the joining of two people in marriage. There are many versions of this gesture illustrating the union of husband and wife and is the origin of the phrase “tying the knot.”

In the Celtic tradition, the Handfasting Ceremony includes 13 ribbons, each with its own meaning.

Hand fasting is an ancient Roman and Celtic wedding tradition which involves tying the bride and Groom’s hands together to symbolize coming together and remaining together. During the Roman Empire, the couple’s hands were tied together with grape vines and rope which explains the origination of the phrase “tying the knot.”

Handfasting was also later used as a form of marriage in the British Isles during the early Christian era. The couple’s hands were tied together with a cord in front of friends and family and were then considered legally married. They would have a formal wedding ceremony later when a priest was available to officiate.

Colors

Red – will, love, strength, fertility, courage, health, vigor, passion

Orange – encouragement, adaptability, stimulation, attraction, plenty, kindness.

Yellow – attraction, charm, confidence, balance, harmony

Green – fertility, luck, prosperity, nurturing, beauty, health, love

Dark Blue -for a safe journey, longevity & strength

Light Blue – tranquility, understanding, patience, health

Purple – healing, health, strength, power, progress

Black – strength, empowerment, wisdom/vision, success, pure love

White – spiritual purity, truth, peace, serenity and devotion

Gray – balance, neutrality

Pink – love, unity, honor, truth, romance, happiness

Brown – for healing , skills & talent, nurturing, home & hearth, the earth.

To begin, I got 12 rolls of 1 inch satin ribbon. I made 4, 3 strand braids.

  1. Dark blue, light blue, gray.
  2. Orange, red, yellow
  3. Pink, purple, green
  4. Black, white, brown


13515279_10209549592601788_395540280_n.jpg

From those 4 braids, I braided them all together in a 4 strand braid. This is the pattern I followed, which was much easier than I thought it would be. dd2a85afe3973c777e6a755377a77cd3.jpg

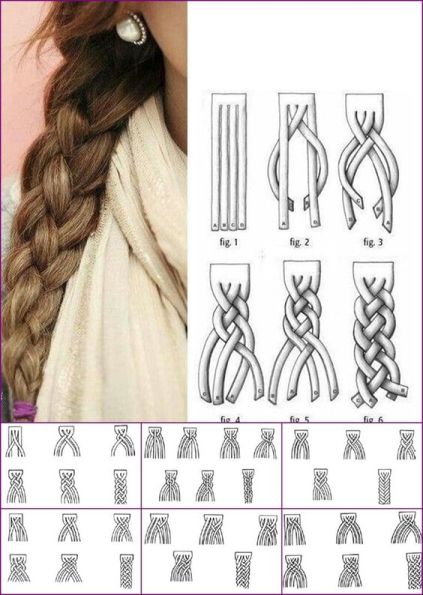
It took about 10ft of each ribbon to make this strand. After braiding it all together, I took it all apart. The ribbons will be laid out to have well wishes, blessings, and love, written on them by women who attend the bridal shower. Their love will literally be braided into our vows.

I love old farm house windows. I like old things in general more often than not. We had a few at our house, my future MIL had some, and she found a few on the side of the road from people redoing their house. Each mom made a window with pictures of Ethan and I, and a window of us through the years.

13530290_10209549592881795_668376984_n.jpg

13521076_10209549593321806_2025742826_n.jpg

13535880_10209549592681790_1549668933_n.jpg

13530281_10209549592801793_1841575917_n.jpg

We used the windows, pictures, acrylic paints, clear picture corners, and window/chalk markers. They will be used to decorate both the shower and the wedding.

Other windows will be used for the hot chocolate bar at the wedding, favors/guest book, a memorial window, and one with a saying on it that we just like.

13530739_10209549592841794_736689053_n.jpg

My mom wanted to have something to string across the front of some tables, and on the wall to create a little backdrop while I open gifts. We were really struggling to find something pre-made that we liked. The shower is pastel colors, I’m not really into gold or rose gold, so finding something to go with our theme was non-existent. Using doilies we got at Michaels, rainbow twine, and some square scrapbook paper, my ma made this really cute swags. All she did was fold the doilies and paper over the rainbow twine and secure them closed with a single piece of double-sided sticky tape. BOOM! Quick and easy AND they match the shower stuff perfectly! Each doilie pack came with 40, so we have more than enough to give each guest a doilie for their tea cup at each place setting as well.

You can see they made a great little addition and cute place to snap some photos!

Each guest is getting a jar of homemade strawberry jam, a honey stick from a local bee keeper, and 2 tea bags. I am all about the personal touches. I found these great “K” stickers at Michaels for a little more than $1. Each jar got a “K” just to add some personalization.

13391068_619444768222711_1486803677_n.jpg

On each bag there is a folded doilie. On the doilie I wrote their name, their table name, and “How Sweet of You to Come!” We got basic white doilies, ribbon in a few different colors, and paper bags in a few pretty colors.

I’ve been to so many beautiful wedding and bridal showers that are just impersonal. You could remove the bride and groom and be at anyone’s wedding or shower. The personal touches are what make a wedding or shower, whether our own initials/monograms, or our guests. It is so easy to make your guests feel special and make your day YOURS.

Stay tuned as more decorations are completed over the next few months! Follow me on instagram@brunetteswithbrains to keep up with the latest posts and news!